My Favorite Cello Gear
There are a few things that I use almost daily as a cellist.
Some of this gear I purchased on recommendation from colleagues (my cello chair, for example), and other gear is the result of a long searching process with a lot of trial and error.
I wanted to assemble this list for two reasons.
First, I hope it will save you some time searching for the right gear (I’ve included links to nearly all of the items in my list).
And secondly, for cellists who are earlier on in their journeys I hope this list helps to make sure that you are doing everything you can to help yourself progress as a player and to maintain the health of your instrument.
METRONOME APP
This app is a game changer. Instead of bringing a battery-powered tuner/metronome with me, I now use this app exclusively.
It has a number of metronome functions you can use (I only use a tiny fraction of what it can do), and it has an excellent tuning function that I’ve found to be extremely accurate and much easier to use than my previous handheld device.
I now know down to the decimal point how sharp or flat a note is, and from the same home screen I can use the tuner, turn on the metronome, or even adjust the tuning temperament I want to use.
On this app I put the tuner’s temperament to P5ths (which will make your open strings perfectly in tune), and set the tuner gauge to Strings Fine. Between the two main functions of this app, I usually have it on whenever I am practicing.

ROCKSTOP
This attaches to the front left leg of whatever chair or bench you are sitting on and the endpin of your cello fits into the holder.
I use it whenever I play, even if I could just find a groove or divot in the flooring with the point of my endpin.
I would buy two; one for your usual practice place, and a spare one for your cello case. It can be a real hassle to arrive somewhere that requires a rock stop only to realize that you left yours at home.
I have tried endpin anchors (which don’t attach to my chair via strap), but I noticed that even the slightest amount of dust on the bottom caused the anchor to slide around while I was playing.
I like the one below - I have had mine for years and it has shown no wear and tear. Sturdily built and gets the job done.

CELLO CHAIR
As cellists we sit whenever we play. Don’t underestimate the value of a good chair!
Most cellists I know, including myself, like to sit on a chair with shorter legs in the front so that the chair pitches you forward slightly to meet the instrument.
This helps me add more of the relaxed weight of my arm into my bowing, which is more efficient and also creates a better tone.
This particular chair has some nice features. All four legs are individually adjustable so you can create whatever seating plane you wish. It also folds up well for storage or to carry (note: it is heavy, so not a good chair if you need something lightweight you can carry with you constantly).
To make myself even more comfortable I add this wedge shaped chair cushion. For those of you who have longer legs, this type of cushion can help you find more comfort and a better playing position.
When we sit to play cello, we don’t want to have a 90 degree bend in our knees. We want to be sitting high enough so that the knees are somewhat bent and the feet are resting fully on the floor, but if our legs are overly bent, it compromises our balance and can also be uncomfortable after a long period of time.

STRINGS
I should start by saying that string preference is of course totally subjective, and furthermore different types of strings will work best with different types of cellos.
But I do think that the Pirastro Perpetual strings are generally excellent and would work great on most instruments. To my ear they are darker in tonal color and smooth sounding while providing a very solid core sound.
I find them just slightly more flexible under my bow than the spirocore C and G, and I personally like that quality.
I’ve tried a number of other strings in the past and love experimenting with new combinations, but every time I need to order new strings, I find myself sticking with this specific string set because I know they are a great fit for my instrument and they basically check off all the boxes for tone, quality, power, and ease of playing experience.
I also liked the Versum Solo string set (warmer and more colorful on my instrument than the Perpetuals).
Trying out strings is very fun but very expensive, so if you are newer to all this, I would suggest finding a great player you know and letting him or her try your cello. They may have an idea of what might work best for your particular instrument after playing on it for a few minutes.
Warning: Be careful where you buy strings. I’ve had friends buy them off of Amazon in the past and they clearly had been lightly used (there was rosin on them). This is actually a problem for strings, because every time they are brought to playing tension and loosened it affects their lifespan.
I usually order my strings from an online store like Shar Music, or I buy them at my local violin shop. Because strings are expensive, keep an eye out for sales! Shar has 20% off string sales multiple times a year and I try never to pay full price. You can sign up to receive promotional emails from them which contain sale information.

CELLO CASE
I have used my Brack cello case for the past 5-6 years and absolutely love it.
It is a bit bulkier in size than some of the other cases out there, but it is lighter than almost all of them and on the inside it has a layer of material designed to regulate temperature and I actually think it works.
With some cases, if the outside is hot to the touch then you can bet your ass the inside is just as hot (which is not good for instruments).
Even if the outside of my case heats up after a minute of direct sunlight, I’ve noticed that the inside will still feel much cooler when I open it.
It also has a very secure neck cradle that I like and the velcro on the bow holders has stayed perfect even after 6 years of daily use.
To top it off, all 5 of its locks are replaceable in case of damage.
Before this case I had a BAM high-tech case that was very handsome, but after about 2 years it started to fall apart on me.
First a couple of the non-replaceable locks broke from standard use, then the velcro on one of the bow holders tore off completely. I managed to squeeze almost 4 total years of use out of it, but I was pretty unimpressed with my experience.
The new BAM cases might be made differently these days, but I feel like like I need to share this experience because of how contrasting my experience with the Brack case has been.
Warning: I would advise against going with any kind of soft case for your own personal cello. It’s way too easy to damage the instrument or misalign the bridge from even the most harmless of bumps.
If the Brack case is too expensive of an option, I would recommend the Gewa Pure 4.6 Polycarbonate 4/4 cello case.

HUMIDIFIER
Living in Los Angeles can be a little precarious as a string player.
Cellos generally like a humidity level around 50%.
Where I live in West Los Angeles the humidity is frequently in the high 30s, but on a rainy day my practice room might go as high as 60% and on a dry spell during the Santa Ana Winds my room’s humidity might drop as 10-15%!
When the air gets this dry it will suck moisture out of your instrument which will give it an unpleasant brittle sound and will also cause the wood to shrink to the point that seams begin to open in the glue that connects the various pieces of your cello’s body.
Maintaining a good humidity level is one of the best things you can do to ensure the health and sound quality of your instrument.
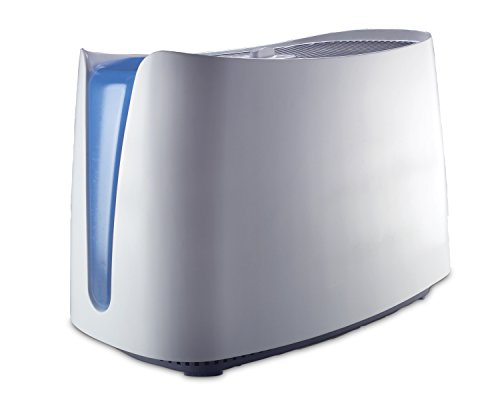
For this reason I use two humidifiers.
The first is a general room humidifier and I like it for my cello because it doesn’t pump out a thick stream of wet mist so I don’t worry about having it too close to my instrument (while humidity is good, mist falling directly onto your cello is definitely not a good idea).
It’s easy to use and I regularly change out the disposable filter and clean the machine itself, mainly to get off any dirt or mineral deposits from the water. Also keep an eye out for the beginnings of any mold accumulation from all the moisture and remove it diligently.
The second humidifier I place inside my cello case where the instrument’s scroll goes. This case and reusable pouch does a great job of keeping my cello nice and humid even if I’m going into the valley or the desert to perform.
If you start playing music with others or working as a freelance performer, it’s inevitable that you will expose your cello to an environment with either too much or too little moisture.
Just try to make sure you keep your cello happy as often as possible.

ROSIN
I have probably tried 20 different rosins at various points in my journey, and at this point I’ve come to trust Pirastro Oliv brand as being an overall great choice.
I go through phases where I’ll prefer a lighter rosin or a heavier, stickier rosin.
For the past two years I have been using a brand called Baker’s, and I would totally recommend it except that they make a very limited amount and apparently aren’t even admitting anyone onto their waiting list anymore.
If I wasn’t using Baker’s, I would choose Pirastro Oliv. I think it’s technically a rosin designed for Violin or Viola, but I have always had a great experience with it on different bows and different cellos.

CLEANING CLOTH
As far as cleaning cloths go, here’s my advice.
First, use two cloths at the same time.
One cloth is for the body of the instrument (any part with varnish). The other cloth is used to clean off the strings and the fingerboard.
Secondly, instead of buying my cleaning cloths from a shop or online violin store, I just go to a fabric shop near me and buy a swath of material (soft cotton) that resembles the feel of the cello cloths that are sold by companies.
I bring the swath of fabric home, cut it up with a pair of scissors, and voila I have 20+ new cello cloths for under $10.
20 may sound like a crazy amount, but it means that I end up using fresh cloths way more often and this way I don’t run the risk of polishing grime and rosin into my cello by cleaning it with a dirty cloth.
TABLET - MAC IPAD 12.9
I was debating including my iPad in this list because it is so expensive and it is by no means as necessary a piece of gear as the rest of my list.
But switching over to an iPad has been a wonderful experience for me and there are a few features that might be of interest to adult learners with a little extra money in their cello budgets.
I have a number of adult students who don’t have the greatest vision at medium reading distance (I don’t have good reading vision either), and when this larger iPad came out, I realized that the lit screen, along with the fact that I could crop and enlarge the music, made a huge difference in my comfort.
I was squinting less and no longer craning my neck forward just to be able to read the notes.
Also, if you have great vision like my violinist wife, then you can probably even get away with using the smaller iPad.
I also love having all of my music in one place and being able to call up anything I might possibly need in just a few taps on the screen.
What makes this possible is the app Forscore. This app lets you do anything you could do to paper sheet music.
You can annotate it, highlight it, write down notes, crop the music to enlarge it, etc. Furthermore, you can organize your music meticulously in the app’s library, collate and rearrange pages to your heart’s content, and much, much, more.
There are times when I will still buy the physical sheet music for new pieces that I am working on, but honestly I think it’s more out of a desire to collect than out of necessity.
When I perform a sonata with a pianist these days, 99 times out of 100 I will elect to use my iPad because along with looking sleeker on stage, it also lowers the chances of a mishap.
Mishaps include bad stage lighting that render the music illegible, wind or a/c blowing the sheet music off my stand, trouble with physical page turns because there isn’t enough time, and having the batteries of my stand light suddenly give out on me.
All of these things have happened to me, and now I feel more protected from these types of situations.
If you do purchase an iPad and the Forscore app, here are two other things that will complete your transition into 21st century instrumental experience.


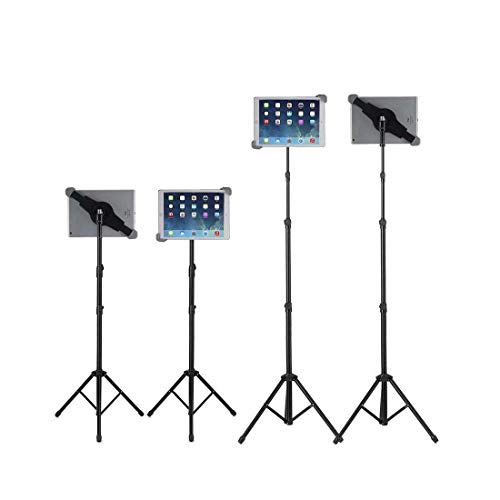
IPAD STAND
Honestly I picked this stand because of its price point and the absence of awful reviews on amazon.
It’s cheap and it has been getting the job done for me, but I would not say it is especially well made and sometimes I’ve had to wrestle things back into place.
For a much nicer version, try the one by K&M. They make great products.
The main point is to use an iPad stand and not a regular music stand.
With a regular music stand, all you need to do is tip it slightly and you risk your iPad sliding off and crashing to the ground.
Also, for performances a smaller stand looks better and blocks less of the view for your audience.
Warning: Make sure you get a stand that can fit the 12.9” iPad if that’s what you bought. Not all stands fit every iPad size.
PAGE TURNER
The final piece of the electronic puzzle is a page turner.
There are two pedals. The right sends you one page forward, the left turns back to the previous page. The device is wireless and connects to your iPad via bluetooth.
For practice purposes, the pedal isn’t usually necessary. It becomes more necessary for performances so that you can turn the pages of your music without using your hands.
There will be a learning curve regarding finding the pedal with your peripheral vision and tapping the page turner at the right time, but I still find it easier than having to lean forward and flip a piece of paper with my fingers.